Sourav Basu shares his experience of Pin Parvati Pass trek during post monsoon in early September’2006
This is an account of how 4 of us – Krishnendu and Saptarshi (founder of Himalaya Trekkers), Arunava and Sourav – did this trek in beginning of September 2006. If I may put it a little differently, this is also intended to be a guide to how NOT to do this or any other trek – unless of course you are flat broke (as we were in 2006), have an ambitious and absurd cost plan (which will not come true), don’t really feel the pain once you are in the mountains, can sleep like logs irrespective of near-frozen droplets falling on your head at night and are blessed with good weather and an excellent guide-porter team.
Things to remember:
Before going in to details, I would like to list down my philosophies for any ‘trek’ where one intends to go beyond 14000 feet. Of course, many experienced and champion trekkers are and will be exceptions to these, but I feel it might help many enthusiasts who are relatively new.
1.PREPARE a little bit before going to a trek. If you are physically active – play outdoor games regularly or have a habit of walking/ jogging – and are in your 20s, you will be able to manage without doing anything else. For everyone else, it is important to practice walking for long hours. Just to quote a number, you should walk 5 to 10 kilometres at least 14 times in the month leading up to the trek. That will amount to around 1 to 2 hours of walking on flat land in sufficient oxygen conditions.
The above has got nothing to do with reducing your weight by 4 kilos and waist by 2 inches, it is rather an exercise which can ensure that you overcome the different aches you are going to feel after the first day. There will also be times when you have walked for eternity and are wondering how far the camp is, and, someone will tell you that there is still 4 kilometres to go – you will know what that entails
2.BE READY TO ABANDON THE TREK if it is snowing. If you are really keen to try your luck out, go till Mantalai Lake, but do not try to go beyond unless the weather is clear. Take the advice of the guide and trust him/ her. A seemingly easy route can become impossible to cover if you can’t see beyond a few feet and everything around you is uniformly white. Additionally, even if you are carrying crampons and gaiters, it is extremely difficult to walk on snow, if it is more than ankle deep, without prior training.
3.DON’T PANIC (to quote The Hitchhiker’s Guide to the Galaxy) if you feel breathless – it is the natural scheme of things once you progress beyond 10000 feet. You should have a mild to moderate headache for a day or two, might feel nauseated and/or lose your appetite. THAT IS NORMAL. If you are not sure, take a rest day, stay outdoors and take short walks to help your body acclimatize to the atmospheric pressure. If your condition worsens, lose altitude, go back to Khirganga and spend the rest of your holidays submerged in the hot water spring
What you will need:
We were going on a ‘budget’ trek – we were carrying everything. In other words, we had hired tents (which were not checked), hired sleeping bags (bulky), cheap shoes (also called police ‘hunter’ shoes, with a good sole and a canvas top), worn out rucksacks (the support of the rucksack is of prime importance for the back), torch, spare batteries, couple of pairs of socks (too low a number), sweaters (takes up a lot of space), windcheaters which were actually raincoats (sweats inside and impossible to wear while walking even with the zip open), mattresses, plastic sheets, jeans (difficult to dry and heavy when wet), 6-7 t-shirts, 1 track bottom made of parachute material, 2 kerosene stoves, 20 litres of kerosene, all types of food items, a kilogram of potatoes, another of onions and so on. We had 1 guide (own load) and 4 porters (30 kilograms each) and as a result, the resultant weight of each of our rucksacks was around 18 -20 kilograms.
This trek consists of 2 sides – the Pin side (before crossing the pass) and the Parvati side. The former is moist and you can face a lot of rain if luck is not on your side. If the tent is not good, you will need the plastic sheets to cover the floor and every morning you will find moisture dripping in from the roof. That, of course, does not mean that you are going to die. But if you are keen on having a sound sleep after a tough day, well, good luck about that.
A safer and saner way of doing this trek should mean that you are not carrying more than 15 kilograms on your back. It would also entail a little more care in choosing your personal and team stuff.
A tent and a sleeping bag are basically life savers and one should never compromise on them. Hired tents are rarely of good quality because of frequent use, poor maintenance and non-availability during trek seasons. You should always pitch a tent, check if the outer and inner layers are touching (they should not), check for tears, quality of the zip etc.
Apart from being bulky and the amount of space it occupies, hired sleeping bags often turn out to be straight-jackets. Whatever be the temperature outside, you need to be warm and allow yourself a good night’s sleep. A good sleeping bag should have full zippers, allow movement but not be too roomy at the same time, be light and become small when packed. A good firm rucksack is essential. It should have a good support and straps should be adjustable.
Choosing the type of food is also very important. As you go higher, generally you tend to lose appetite/ taste and having something tangy to taste would be helpful (On the contrary, the spread HT provides would make you look forward to every meal). Whatever is the food you prefer, plan for a breakfast which is different on different days (viz. noodles, khichdi, aloo parantha etc). Plan for a hot soup as soon as you reach camp and carry coffee, tea, hot chocolate etc so that you can have 3 rounds of hot drinks everyday – once in the morning and a couple after dinner before you snuggle inside your sleeping bag. It might be a good idea to have something light to eat immediately after reaching camp – we used to have puffed rice and ‘chanachur’, or, ‘masala chura’, or, ‘jhalmuri’ (sorry, I could not find any English translation for these). During the trek, you need to carry chocolates and raisins and keep having them during the day. You have to figure out lunch and dinner, but remember lunch has to be packed on most days as you will be having them en route.
Coming to personals, first get a very large polythene bag which can form a water-proof liner inside your sack and ensure that you have a sack cover. It is of utmost importance that the stuff inside your bag does not get wet or feel damp. Even if it rains hard, you need to be able to change in to something dry after reaching camp. Carry spare plastic bags (DON’T leave them behind in the mountains) so that wet clothes can be kept separate from dry ones – if the weather is bad, you might not get a chance to dry your clothes ever. By the same logic, you should have 4 – 5 pairs of socks, sufficient change of underwear, enough t-shirts (you can use climacool/ dryfit type t-shirts alternatively) and a couple of good quality track lowers made of parachute material – basically stuff that can dry out fast. Having a torch, or better still head torch, is an absolute essential.
You need to have good shoes with leather on top and a sturdy sole, unlike our canvas ones (they had pretty good grip though, and came for Rs. 60, “Hunters” from Kolkata flee market). Be prepared to trip over boulders, accidentally kick rocks, step on sharp rock edges and walk on ice or snow. Woodlands shoes are heavy but otherwise pretty good. It is preferable to have ankle high shoes so that even if there is a little bit of snow you are well protected. Always carry a pair of sneakers (since they are light) as back up and a pair of slippers for using around the tent. Also, carry your own mattress. Make sure it is of the thicker variety – there are various available of various qualities and prices. Ours were the thinner variety which came for Rs. 100 and at times, we could feel the protruding rocks under the tent which is again not unbearable, but undesirable after a tiring day if it keeps waking you up. Last but not the least, carry a pair of sunglasses and a pair of gloves (leather preferably, rexin or other waterproof material will also do, but not wool for heaven’s sake). The sun is going to be really strong and if you find snow it will be even more essential.
If you are travelling with Himalaya Trekkers (or any other agency) the team needs would be taken care of – which include you would only have to carry a knapsack (unless you insist otherwise), tents and food would be ensured by HT and you can also opt for the sleeping bag and mattress to be arranged for you. Otherwise, apart from the above, you also need to find a guide and make sure porters/ mules/ horses are also arranged. DO NOT go without a guide on this trek.
The day wise planning that is going to follow is for the best and most enjoyable way of doing this trek. Alternatively, if you have a very fit team and do not have enough time, or, you want a strenuous trek before embarking on something more sinister, you can reduce at least 2 days from the following plan.
One final tip: If you are not the very fit type, try to leave camp by 7 in the morning so that you maximize the chance of getting some sun after reaching the next camp. Sunlight is one of the most rejuvenating friends for a tired body before the cold sets in.
Day 1: Chandigarh to Manikaran via Bhunter
We reached Chandigarh very early in the morning (by Delhi Kalka mail) and then took a bus for Manikaran from ISBT. Unfortunately, that turned out to be a 12 hour journey due to an upturned truck on the way, but normally it should take only 8/9 hours.
Of course, if you hire a car you can get there much faster. Manikaran is a pilgrimage for the Sikh and has a Gurdwara with a hot water spring, lots of Punjabi food (no non-veg of course). It is also a good place to buy vegetables, rice, daal and most importantly kerosene etc. (all of which would be taken care of by HT) and any other small item you might have forgotten to bring viz. torch batteries, gloves.
If you are going by yourself, you would probably meet your guide here.
Day 2: Manikaran to Khirganga via Barsheni
The best idea is set out by 7 in the morning, take a bus and reach Barsheni in around 2 to 3 hours. If you are going with Himalaya Trekkers (HT) that will be taken care of. We started at 9 (thanks to late night packing) and reached around 12.
The trek starts from here and the walk to Khirganga is around 12 km (at least that is what we knew). The altitude gain from Barsheni to Khirganga is around 3000 ft and therefore, the trek is generally in the upward direction all throughout.
If you have a fit team it should take you around 3 – 4 hours to reach. If you are a person who will huff and puff the ascent and take several water breaks, it will probably take you around 5 to 6 hours to reach Khirganga.
The route is completely green and you will find apple orchards in the earlier part. If the weather is moist, keep your eyes open for rainbows of all shapes and sizes around you (even below). Small springs, waterfalls will be in plenty. Of special mention is ‘Rudranag’ which will remind you of a picture postcard. Once you have reached it, you are just around one-quarter of the distance away from reaching Khirganga.
Don’t forget to take a bath in hot water spring at Khirganga. After the long walk and with the cold darkness around you, it is going to be an experience that you should not miss. Khirganga has places with comfortable bedding and good food and also plenty of camping locations.


Day 3: Khirganga to Tundabhuj
This is also going to be a long day. First, there is going to be a descent and you will be able to see the river running through unusually trimmed green meadows and dark green pine trees. The route will not have many tall trees as the altitude increases gradually. The altitude gain is around 2000 feet and therefore, it would be an upward gradient for most of the day. Going by the gradation discussed before, this can take anywhere between 7 to 8 hours of walk.
There will be lots of tracks along the sides of the mountains and a few wooden bridges over small turbulent rivulets. The final climb is going to be a long one and after crossing another suspicious looking wooden bridge, you can expect to reach the camping ground in front of 5 majestic stony peaks (called ‘Pandushila’) and a deep gorge in-between. There is a waterfall slipping down the rock mass and then falling straight down a long way below, where a VIBGYOR has an eternal presence in the water.
You should start to feel the lack of oxygen during the day, though once you reach a rhythm it will not be too problematic. The ones who would rest more frequently would suffer more, so the idea is to keep walking without breaks.


Day 4: Tundabhuj to Thakurkuan
This is going to be a relatively easy day. There is no ascent or descent which should be of any concern and the distance is small.
Teams should cover this distance within 2 to 3 hours and reach a camping ground situated between 2 streams – around 200 feet apart and we camped before crossing the Parvati River. During the walk we got occasional drizzle. We were amazed to find few desolated huts which were used by an earlier survey team. After extensive cleaning of dung we managed to clear two rooms, one for our kitchen and the other to sleep. We were fortunate enough to have a small stream-to-stream tailor-made rainbow delivered to us by Mother Nature towards the evening, but I am sorry, that is not a guaranteed view.


Day 5: Thakurkuan to Odi Thatch
This will be a fun and long day. First, you need to cross over the narrow but fast flowing waters of the Parvati River in a makeshift rope way. It will take less than a minute to cross but the excitement of sitting in a metal half-cage and zooming over the river would be an experience worth remembering and capturing in a video camera. The walk during the day is long and you would be following the Parvati River almost entirely.
The second part of the fun would be crossing the Pandu Bridge after a couple of hours. It is actually a giant boulder over the stream some 20 feet below and you are expected to walk along the ledge of the boulder to the other side. It is only about 15 feet to the other side and the boulder surface offers comfortable friction, but even knowing all this will not stop your heart from beating doubly fast.
The last part of the day, would be over a huge field along the Parvati river, with innumerable ups and downs (only around 15 feet) which would wear you out. You would be able to see the mountains in the distance, but that distance does not seem to lessen even as you keep walking endlessly.
Till this point in the trek, you would have sheep and goats for company as they are brought and kept in sheds at this altitude till the onset of winter for excellent grazing options.
This will be a long day (between 6 to 8 hours), but the camping ground is going to be really beautiful. It is located on a huge field with a rocky peak (later came to know Kullu Eiger)and other mountains in the front through which you would be able to hear the howl of the wind. The Parvati River is on the right. It is at the juncture from where the river goes to the right (actually, the river is coming from that direction) and running through a moraine ridge which is visible in the distance.


Day 6: Odi Thatch to Mantalai
The good part of the day is that 80% of the trek is along a very gently flowing Parvati river. You would be able to see the final 20% as well, as in the distance the Parvati river seems to come down from behind a wall of debris. The final bit is a quite treacherous ascent and would be a ‘trailer’ of what lies ahead in the next leg.
After the steep climb, you would reach the Mantalai Lake and it is really breathtakingly beautiful. There is a shrine for offering prayers and then the trail continues along the side of the lake and after a few ups and downs you would reach the camping ground of Mantalai (4 – 5 hours).
I will deliberately not try to describe Mantalai and Chhota Mantalai. All I can say is that, after 5 strenuous days this is going to be a reward for tired souls and would amply justify why we come on treks instead of staying in the comfort of a good hotel at any hill-station.
Situated at an altitude of around 13500 feet, this can also serve as a perfect location for a rest day. Given that the pass is at 17500 ft, which is considered pretty high altitude, this is a perfect place for acclimatizing and recharging your batteries.
Even if there were no other reasons, a place like this, in my opinion, deserves a little more savouring


Day 7: Rest day at Mantalai
Laze around, eat well and maybe, if you are keen on feeling clean and the sun is up, you can try having an extensive cleaning session in freezing water. We had a shave and a shampoo. Our heads went numb for a couple of minutes, which was a unique experience.


Day 8: Mantalai to Base camp
The day begins with an assault on your lungs. First thing in the morning, you need to cross a stream and start climbing on all fours up the side of a mountain. The trajectory eases out somewhat after the first climb, but throughout the day it is going to be in an upward direction.
As you make progress you would realize for the first time why you need a guide on this route. The path becomes rocky and there is no trail to follow. There are markers all around but they are pretty difficult to spot as the terrain turns in to a destruction zone. We went up the wrong mountain and that prolonged our journey in a big way, so I might not be able to give a very accurate range for the time it should take on this day. My guess would be somewhere between 5 to 8 hours.
There is another stream crossing before the final climb and the water is going to ‘bite’. The last climb happens in 3 steps, so be mentally prepared that your suffering is not going to end easily. The camping ground is right below the glacier and on a rocky terrain and there are chances of freezing wind blowing over the glacier. You need to have food and disappear inside the tent early on this day and target to leave camp by 4 AM on the next.


Day 9: Parvati side Base camp to Pin Side Base camp over the Pin Pass
Hope that by the time you reach the pass the weather clears up. That is exactly the reason why you should leave camp by 4:00 at the latest, as the highest chances of getting clear weather is at dawn. Also, you are going to get the best view, if you can reach the top at sun rise or thereabouts. We left camp at 5:30 am and had a cloudy day throughout.
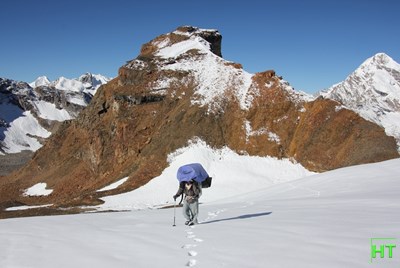
The walk in the first phase is going to be over a gently rolling glacier. If there is a lot of fresh snow, it is going to be a difficult stretch. Otherwise, it is not difficult except for the shortage of oxygen at this altitude. Try not to stop too frequently and set your own pace and it should be fine.
We got snow only in patches and the rest of it was glacial ice which was a bit slippery and caused a bit of fluttering in our stomachs – there are some ominous looking dark glacial pools along the way.
The view all around is going to be majestic of course, but you got to be there to witness that.
The pass will come as a final climb of around 500 feet or so. It is an abrupt and pretty steep wall which appears out of nowhere (that could have been an effect created by a cloudy day in our case). The climb is going to be painful, as you would expect, but then, it is the only real ascent in the day.
It should take around 2 – 4 hours to reach the pass.
I won’t try to describe the view from the pass. At the top, when it opens out in all directions, it is bound to be breath taking. We had a fair amount of clouds and so could not get a view of the faraway peaks and yet, the view of the peaks through the mist was surreal to say the least.
You would cross over to the dry Pin side once you have left the pass behind. There is a steep descent of an hour or two before the base camp on the other side can be reached.
Just before reaching the camp, there is a pretty wide stream which comes out from a glacier just a few hundred yards away. With thigh-deep freezing water threatening to sever our legs, the ordeal seemed much longer than the 5 to 10 minutes that it actually took.
If you can make it to the camp by 10, you can consider walking another 25-28 KM and reach Mudh on that day itself. That would make it a very challenging day. But if you are in a hurry to reach civilization on the same day, or, really want to stretch yourselves for tougher treks/ expeditions later it is a doable walk.
We reached at around 1 and decided to laze around in the hot sun and bask in the glory of the conquest of Pin-Parvati pass.


Day 10: Pin camp Base camp to Mudh and then by car to Kaza
This was a long day for us. We started at around 9 and reached Mudh at around 5:30. Of course, we were in no hurry and took innumerable breaks and the valley is so beautiful that it was difficult to get up and walk at certain times. The valley is flat and the descent is almost imperceptible. Over 25 – 28 KM the altitude loss is only about 2000 feet.
The walk can be divided in to 2 zones – one up to Chinpatta and then from Chinpatta to Mudh. The first part has ups and downs throughout but the second part is over tractor road and so is completely flat.
It is a riot of colours on all sides. In the beginning, it has a barren rocky look with the Pin River roaring alongside. Then the wide river valley starts turning green and the mountains are of different shades. Wind erosion over ages has given them bands of different colours and you would be able to see almost all colours of the VIBGYOR around you. To top all that, we got to see autumn colours on the grass and bushes. It was truly mesmerizing.
Mudh is visible in the distance like a speck at the end of the road. But from the time it becomes visible, expect to walk for another 2 to 3 hours before you can reach the village. It is a village of around 150 people with places available to stay. There is also a bus service available which takes you to Kaza. This is the place where the trek comes to an end.
Though we reached in the evening, we managed to get a car and reached Kaza by 7, quickly checked in, had a bath and celebrated our triumph with the whole team. Kaza has lots of excellent food and stay options and for one and a half days we gorged on different types of cuisines.


Day 11: Merry-making at Kaza
Day 12: Kaza to Manali
It makes sense to hire a car, though bus services are available. That way, it is possible to take a small detour and visit Chandra Tall on the way back . On the way, you go up to 14500 feet to cross the ‘Kunzum’ pass where you can have breakfast. There is also a small lone stall at Batal which would be ideal for a bread toast, Maggi and eggs lunch.
It is a long and back-breaking journey to Manali and the view is completely different. It is like a destruction-zone where the mountains seem to be disintegrating to dust. The tops are Mount Rushmore-like and it seems like the creator has taken a break while sculpting different shapes out of them. The river ‘Chandra’ roars and leaps over boulders and looks dangerously beautiful.
Finally, the rocky road ends and the Leh-Manali highway took us to Rohtang Pass. It was time for another break before we started the final descent for the beautiful Manali at the end of the journey.
Supporting photos are taken by Saptarshi